Comprehensive Guide for Problem Solving of Slow and Suspend Windows System

If you are using Windows 10/8/7, and the use of the hard disk (Disk) at 100% Task Manager, it means that something is causing the hard drive stress overwork is one of the common problems that cause the computer slow even almost can not use . You may wonder what you did and what the problem is, answer: often nothing; the problem can happen on its own, and the good news is that it is often easy to fix.

Solutions:
There is more than one cause of this problem and there is more than a solution, in this article we will talk about 8 solutions.
- Disable Windows Search
- Disable the SuperFetch service
- Check the hard drive
- Reset the default memory
- Disable antivirus software
- Change Google Chrome and Skype Settings
- Repair Driver StorAHCI.sys
- Update computer drivers
Note: After each solution, you must inspect the task manager, right-click on the taskbar, choose Task Manager, and see the percentage above the Disk column.
Windows Search is what makes searching for your files fast, and disabling it means not indexing your files, but it keeps searching, but it will take a long time.
You can try to disable Windows Search temporarily and completely if you get a result. Knowing that you can compensate your search using third-party software like Everything
To temporarily disable Windows Search:
1- Click the Windows + X character on the keyboard at the same time, and select Command Prompt (Admin).


Then press Enter on the keyboard.

Solution 2: Disable the SuperFetch service
1-Click the Windows + X character at the same time, and select Command Prompt (Admin).

2- Click yes in User Control window.
3- Enter net.exe stop superfetch command and click the Enter button.

4- Wait several minutes and check the Disk column in Task Manager, if you do not find a result, go to the next solution.
Solution 3: Check the hard drive
2- Click yes in User Control window.
3-Enter the chkdsk.exe / f / r command and click the Enter button.
4-Enter the letter Y. Make sure that you have saved all your applications and files before restarting the computer.

IMPORTANT: Restarting the device The hard drive is scanned for malfunctioning and processing. This process may take up to a full day for some devices. If you do not have time to perform it, you can "skip" and to perform a hard drive check you can follow the same steps.
Solution 4: Reset the default memory
Virtual memory is an extension of the actual computer memory, a combination of RAM (random access) and a part of the hard drive. When RAM memory is not enough to accommodate tasks, the operating system temporarily stores the data on the default memory and then transfers it to RAM when requested.
To reset the default memory:
1- Click the Windows button + Break / Pause button at the same time and go to Advanced System Settings.
Or (If you do not find the Break / Pause button, go to the PC icon and right-click on it, select Properties and go to Advanced System Settings).

2- Go to the Advanced tab and click Settings.

3- Enter the Advanced tab and choose Change in the Virtual memory section

4- Make sure that the Automatically manage paging file size for all drives box is not marked.

5- In the same window, choose the disk on which Windows is installed, which is usually "C:
Then enter the initial size as recommended before Recommended.
Then enter the maximum size, which should not be more than 1.5 times the size of the RAM memory.
For example, if your computer RAM is 4 GB (4096 MB), the maximum memory size should not exceed 6144 MB.
When finished, press Ok.

6- Delete all temp files. How? First click the Windows + R button and type temp and click the Enter button.

Second, in the new window delete all files displayed.

Solution 5: Temporarily disable antivirus programs
If you have installed an antivirus program such as ABH, Kaspersky, Norton, or others, you will have the option to disable the program within its setup.
Solution 6: Change Google Chrome and Skype settings
Found that meeting the specific settings of Google Chrome browser and Skype program in Windows 10 can cause high hard disk consumption to 100%, here is how to repair the settings, knowing that access to some settings may vary from Google Chrome version to another.
1- With the Google Chrome browser, click the three-point icon then Settings.

2- Go to the Advanced section and click on it.

3- In the Privacy and security section, and then close the Use Quickly Load Pages prediction service, use a prediction service to load pages more quickly.

4- Make sure you close Skype.
5- Open Windows Explorer and navigate to: C: \ Program Files (x86) \ Skype \ Phone \

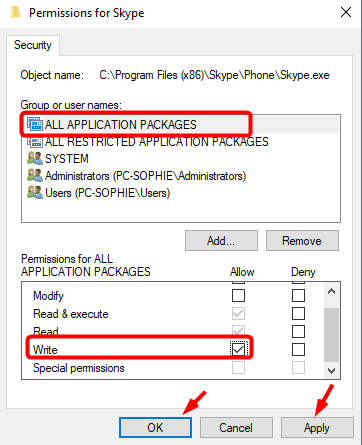
6- Right-click Skype and choose Properties.

7- Go to the Security tab and choose Edit

8- Select ALL APPLICATION PACKAGES, click Allow, mark أمام in front of Write, press Allow, then OK to save.
Solution 7: Repair the StorAHCI.sys driver
StorAHCI.sys driver that comes preinstalled with the PCI Express host controller (AHCI PCle) may cause the hard drive to work at its maximum due to a firmware gap.
Solution 8: Update the computer drivers
If one of the above steps does not resolve the problem, it may be caused by one of your device drivers.
You can update all drivers of your device automatically to the latest version using the program Driver Easy, which recognizes your device and the version of Windows and then download and install the latest drivers installed.


No comments